- All
- Product Name
- Product Keyword
- Product Model
- Product Summary
- Product Description
- Multi Field Search

Smart Card / RFID Label / RFID Reader
| |

HC-AC04
HECERE
| Quantity: | |
|---|---|
Performance parameters are shown in table 1.
Table 1 performance parameter
Frequency | 134.2Khz/125Khz |
Tag format | EMID、FDX-B(ISO11784/85) |
Reading/writing disatnce | 2*12mm glass tag>15cm 30mm animal tag>25cm |
Reading access time | <100ms |
Signal indicator | 128*64 high brightness OLED、buzzer |
Power | 3.7V-4.2V(Li battery) |
Power consumption | Working:0.9W Standby:0.04W |
Storage capacity | 6000 information(tag coding+time) |
Storage time | >20 years |
communication port | USB2.0,wireless USB HID(optional), Bluetooth(optional) |
Weight | 300g (without battery) |
Languaeg | Chinese,English(Can be customized to your requirement) |
Work temperature | -10℃~50℃ |
Storage temperature | -30℃~70℃ |
2.1 Display screen introduction
The scanner can display e-tag information, time, communication mode and storage mode simultaneously with a 128*64 high brightness OLED display. Display screen is shown as image 1.
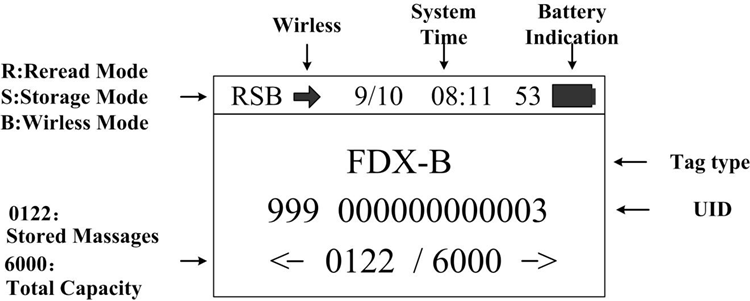
Image 1 Display screen
2.1 Basic operation
¨ Power on
Press and hold the “SCAN” key for 2 seconds in power off mode to power on and enter the main display screen.
¨ Scanning tag
Press “scan” key in main display screen, then the screen will display “scanning” and start scanning tag. The buzzer will ring once after reading the tag and the current tag information will appear on the screen at the same time. The buzzer will ring once and the screen will display “No tag found” if there’s no tag information can be scaned in 10 seconds.
¨ Data viewing
Press ‘<’ / ‘>’ key in the main screen to view tag information and time.
¨ Turn off automatically
In power on mode, the system will enter standby mode automatically if there’s no operation or data transmission within 2 minutes.
2.3 System setting
Press and hold “SCAN” key in power on mode to enter setting mode, the screen will be shown as below.
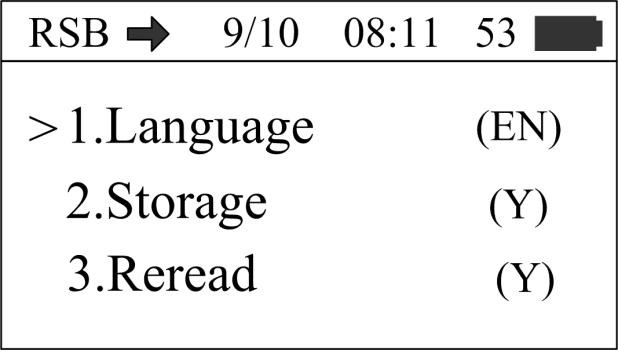
Image 2 Setting mode screen1
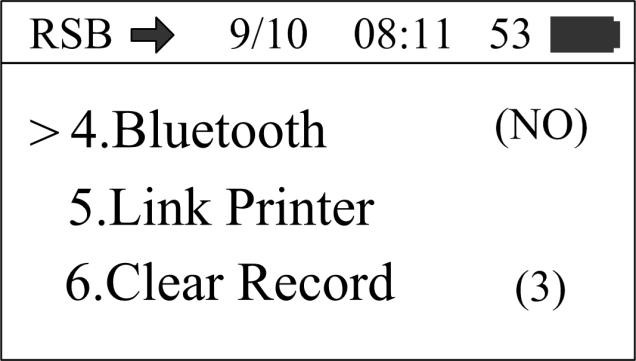
Image 3 Setting mode screen2
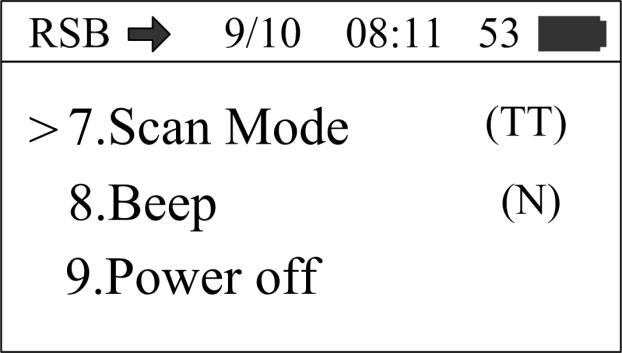
Image 4 Setting mode screen 3
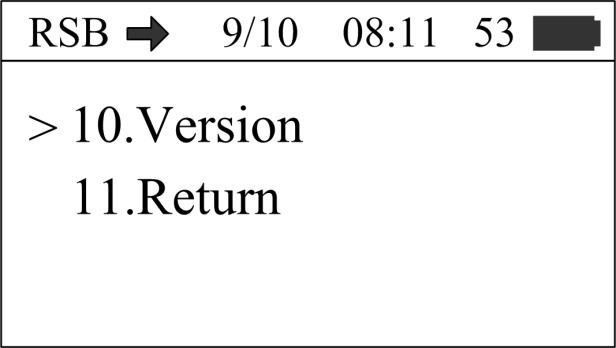
Image 5 Setting mode screen 4
In setting mode, press ‘<’/‘>’ key to select different function settings.
¨ Language Selection
This Scanner support Chinese or English display.
Move ‘>’cursor to the ‘Language’ menu, press the ‘SCAN’ key to select ‘CH(Chinese)’ or ‘EN(English)’.
¨ Storage mode setting
Move ‘>’cursor to the ‘Storage’ menu, press ‘SCAN’ key to select ‘Y’ or ‘N’.
The scanner will store tag information and operation time when the storage mode is set to ‘Y’, the scanner will not store tag information and time if the storage mode is set to ‘ N’.
¨ Reread mode setting
Move ‘>’cursor to the ‘Reread’ menu, press the ‘SCAN’ key to select ‘Y’ or ‘N’.
The scanner will compare the data after reading tag information when the reread mode is set to ‘ N’, the buzzer will ring twice if the current tag information has been stored, users can select whether to store current tag information by themselves. The scanner will not compare the data and store the tag information when the reread mode is set to ‘Y’.
¨ Bluetooth mode setting
Move ‘>’cursor to the ‘Bluetooth’ menu, press the ‘SCAN’ key to select ‘SL’ , ‘MA’ or ‘NO’.
‘SL’ is the Bluetooth slave mode, ‘MA’ is the Bluetooth master mode, ‘NO’ is the Bluetooth power off mode.
¨ Link printer
Move ‘>’cursor to the ‘Bluetooth’ menu, press the ‘SCAN’ key to link the Bluetooth printer.If the scanner link the Bluetooth printer successfully,the scanner will display ‘OK’.
¨ Clear Record
Move ‘>’cursor to the ‘Clear Record’ menu, press the ‘SCAN’ key for 3 times,the scanner will clear the tag information stored inside.
¨ Scan mode setting
Move ‘>’cursor to the ‘Scan mode’ menu, press the ‘SCAN’ key to select ‘TT’ or ‘BA’. ‘TT’ is the RFID scan mode , ‘BA’ is the Barcode scan mode.
¨ Buzzer setting
Move ‘>’cursor to the ‘Beep’ menu, press the ‘SCAN’ key to select ‘Y’ or ‘N’. ‘Y’ is the buzzer power on mode,‘N’ is the buzzer power off mode.
¨ Power off
Move ‘>’cursor to the ‘Power off’ menu, press the ‘SCAN’ key to turn the scanner off .
¨ Viewing version information
Move ‘>’cursor to the ‘Version’ menu, press the ‘SCAN’ key to view the version information.
¨ Exiting setting mode
Move ‘>’cursor to the ‘Return’ menu, press the ‘SCAN’ key to Exit setting mode.
¨ System time setting
Scanner system time can be set by one key setting on computer, please refer to “Data transmission management”.
3. Data transmission management
The information stored in Scanner can be managed by sending them to computer through USB cable or wireless transmission.
3.1 Data base management software
The scanner has a USB2.0 port, you can check storage information, copy data, delete data and system time setting by data base management software after connecting the scanner to your computer through USB cable.
Data base management software is shown as below:
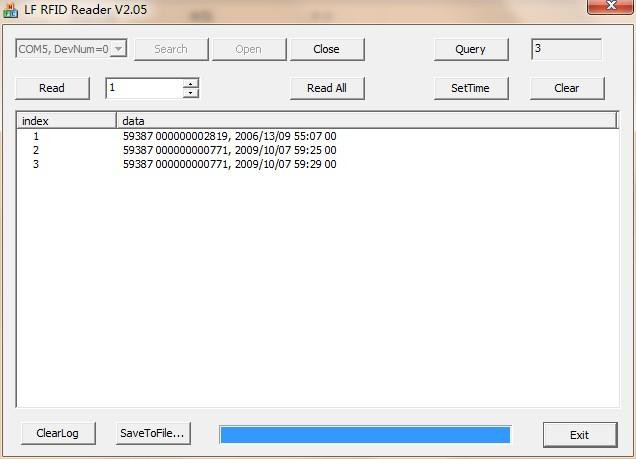
Image 3 Data base management software screen
Connecting the scanner to your computer with a USB cable, then enabling the data base management software, if the function button on the software screen is turned gray to black (it means the system connection is succeed), you can proceed to the next step (you may need to install driver for the first time). The functions of the buttons are described as below:
Query: Get the amount of tag information stored in the scanner. Read: Read tag information in according to the setting amount. Read All: Read all the information stored in the scanner.
SetTime: Set system time of scanner.
Clear: Clear tag information stored in scanner(Note: The information cannot be recovered after deleting).
ClearLog: Clear the data in the textbox. SaveToFile: Save the derived data to Excel table. Exit: Disable
3.2 Wireless data transmission function
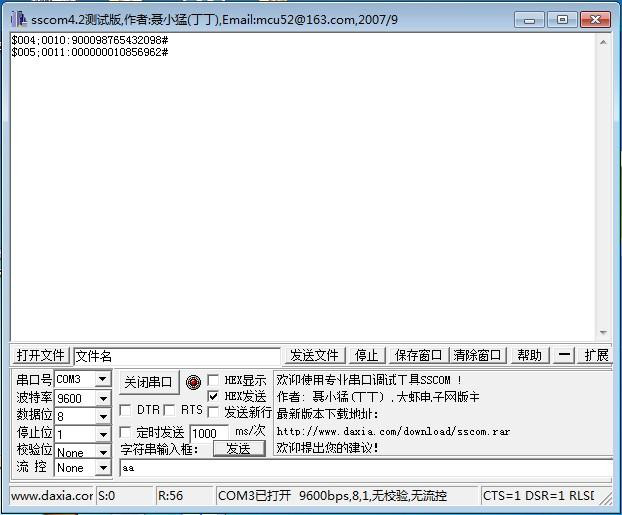
¨ Bluetooth transmission
User can connect the scanner by computer via a Bluetooth interface.
Select the Bluetooth slave mode on the settining mode of the scanner, search and add Bluetooth Device in the computer.The Bluetooth Device’s name is ‘RPD-A03B’,enter ‘0000’ as the default passkey.
Data Format: FDX-B: $004;0010:900098765432098#(‘900098765432098’ is the tag information) EMID: $005;0011:000000010856962#(‘0010856962’ is the tag information)
Data Format: FDX-B: $004;0010:9000987
4.Attentions
1. This scanner is electronic product, please transport and keep it as electrical equipment.
2. Avoid falling down from high places.
3. Do not expose this product to extreme temperatures, humidity or corrosive materials.
4. Unauthorized person can not open the casing.
5. Please use the provided data cable for connecting.
6. Try not to disassemble the battery cover frequently.
7. Please take out the battery if it has not being used for a long time to avoid damage to your product.
6. Package
Sereial number | Item |
1 | USB cable |
2 | Wireless data receiver(optional) |
3 | portable scanner user manual |

